Reading Input Voltage with the Vespa

Introduction
Got your Vespa and want to know how to use it? Don't worry, we're here to help you with these first steps and to show you how to use the basic functions of the library developed for it.
In this tutorial you will see how to read the input voltage of the Vespa and how this can be applied in practice, especially when using batteries.
List of Materials

Lista completa de produtos
comprar
Vespa

Suporte para 2 Baterias Li-Ion 18650


Cabo USB Micro B 80cm
Note: although the above list mentions the use of 18650 Li-Ion batteries, any battery that supplies a voltage within the Vespa operating range (between 7 VDC to 11 VDC) can be used as power supply.
Note: The recommended 18650 batteries listed above are rechargeable, so they must be charged using a suitable charger (such as this one, for example).
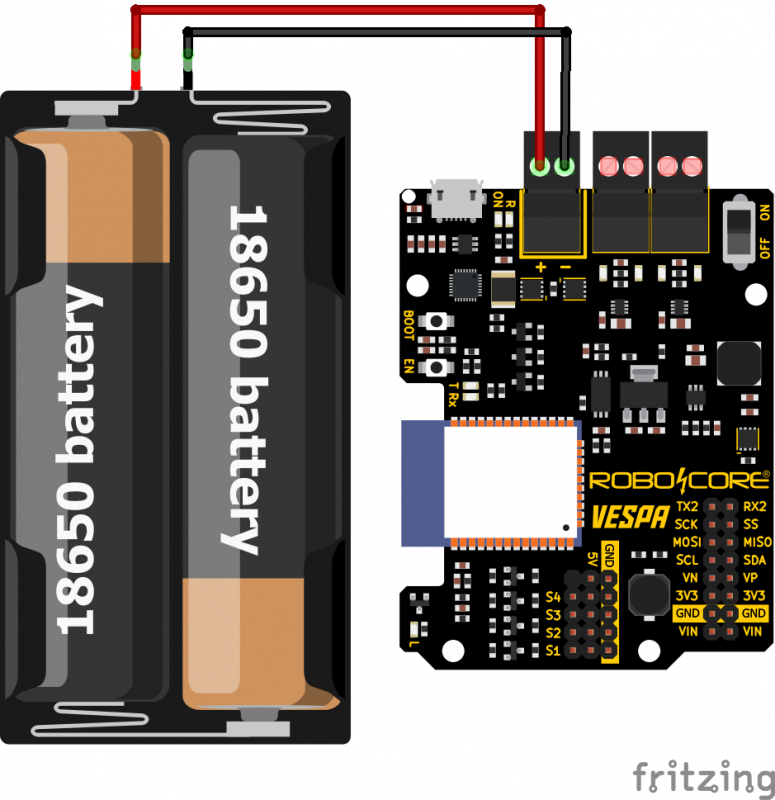
Circuit
To measure the battery voltage that is powering the Vespa, simply connect it to the board as shown below. Please pay attention to the polarity of the battery and the board connection.
Voltage Monitoring
In this first project, we will only display the voltage read by Vespa on the serial monitor, so we can compare it with a multimeter and understand how to take advantage of the board's library for this.
Code
As mentioned above, we will be using the Vespa library, so to install it, follow the steps in the tutorial First Steps with the Vespa.
With the library installed, upload the following code onto your Vespa to monitor the battery voltage connected to the board.
Understanding
The code above starts with the inclusion of the "RoboCore_Vespa" library, and then the battery object is created as an instance of the library's VespaBattery, which will allow us to read the voltage of the battery that is powering the Vespa.
In the code configuration (function void setup()), we just initialize the serial monitor, so that it is possible to monitor the board readings.
In the loop of the code, we have the declaration of the variable battery_voltage_mV that receives the value returned by the function readVoltage() of the library, which is called by the command battery.readVoltage( ). This function returns the battery voltage read in millivolts, therefore, next, the variable battery_voltage_V is declared, which receives the value of the variable battery_voltage_mV divided by one thousand, in other words, converting the value in millivolts to volts. Once this is done, the read and calculated values are displayed on the serial monitor, and the code then repeats itself every 2 seconds.
What Must Happen
After uploading the code to the board, turn on the battery power with the power switch, then monitor the reading on the connected battery. In the case of two 18650 batteries in series, you will see a value between 6.8 V (recommended minimum voltage - 3.4 V per cell) and 8.4 V (maximum voltage - 4.2 V per cell), as in the picture below.

At this moment, if you want, you can compare the Vespa reading with it's real value using a multimeter, through the terminal block on the board. Just be careful not to create a short circuit during the measurement.
Low Voltage Warning
Some robots and some devices that are powered only by batteries have alerts or auto shutdown when their battery is close to reaching the minimum recommended voltage, for example to protect battery life. In this project we will use LED L on the board as a low battery voltage indicator, which will light up when the voltage of the 18650 batteries is below 7.0 V.
Code
To do this, upload the following code onto your Vespa.
Understanding the Code
In the global declarations of this code, in addition to the inclusion of the Vespa library and the creation of the battery object, we also have the declarations of the constants LED_PIN, which stores the pin connected to LED L on the board, and MINIMUM_VOLTAGE, which stores the minimum acceptable voltage for 18650 batteries. If you are using another battery, change the value of this variable to the one recommended for your battery.
In the code settings (function void setup()), in addition to initializing the serial monitor, the pin connected to LED L is also configured as an output with initial low logic level.
In the loop of the code (function void loop()), in addition to reading and converting the battery voltage, as it was done in the code of the previous project, we have the condition if (voltage_bateria_V <= MINIMUM_VOLTAGE) which checks if the voltage converted to volts read by the board is equal to or below the minimum voltage value configured in the variable MINIMUM_VOLTAGE. If this condition is true, that is, if the battery is discharged beyond the limit, LED L will light and an alert will be displayed on the serial monitor. Otherwise, LED L will remain off.
What Must Happen
After uploading the code to the board, monitor the battery voltage again through the serial monitor. You will see that the voltage will be the same as seen in the previous project and LED L will remain off. As the battery voltage must take a long time to discharge, since the consumption of the Vespa for this project is very low, move the power switch on the board to the "OFF" position and observe that you will be alerted that the voltage is low, and LED L will light up.

Warning: Do not let these batteries discharge below 6.8V. Lithium batteries must always have at least 3.4V per cell to function properly.
Going Beyond
As mentioned earlier, battery voltage monitoring can be used in robots to prevent batteries from being discharged beyond their minimum limit and being lost. We use this function in Robot Web Control with Vespa, for example, but you can apply this to your project the way you prefer.
In addition, we also have several other tutorials demonstrating all the features of the Vespa.
Conclusion
In this tutorial we saw how to use the Vespa library functions to read battery voltage in simple examples.
Trobleshooting
Red LED On
If the Vespa lights up a red LED and does not execute the code when turning on the board, check the connection of the battery holder, as it is a sign that it was connected with reverse polarity.
Incorrect Voltage Reading
If the battery reading is incorrect the first few readings, make sure the board's power switch is in the "ON" position. If even in the "ON" position the reading is low, check bad contacts on the board terminal and confirm that the battery is charged with a multimeter.