First Steps with the Vespa

Introduction
Got your Vespa and don't know how to start using it? Don't worry, we are here to help you!
In this tutorial we will show you how to install the USB driver for board recognition, the Arduino IDE, the ESP32 board package in the Arduino IDE, the library developed for the board and how to write the first code on it.
USB Driver Instalation
The first step to use Vespa is to make it recognizable on your computer as a serial port. For this, you will need to install the USB to UART converter driver. Follow the tutorial steps available in the button below to do so.
Driver Instalation TutorialVespa uses the same USB to UART converter as BlackBoard UNO R3, so just follow the procedure contained in the button above to install the board's driver on your computer.
Arduino IDE Instalation
Now that the USB driver for the board is installed and the board is being correctly recognized on your computer, it's time to install the program where the codes for the board will be created and with which we will upload them.
The Arduino IDE, as well as all the other tools that will be installed in this chapter, is completely free and, to download it, just access the link contained in the button below.
Download Arduino IDEWhen accessing the page from the button above, scroll down the page a little until you find a "Downloads" section, as in the following image.
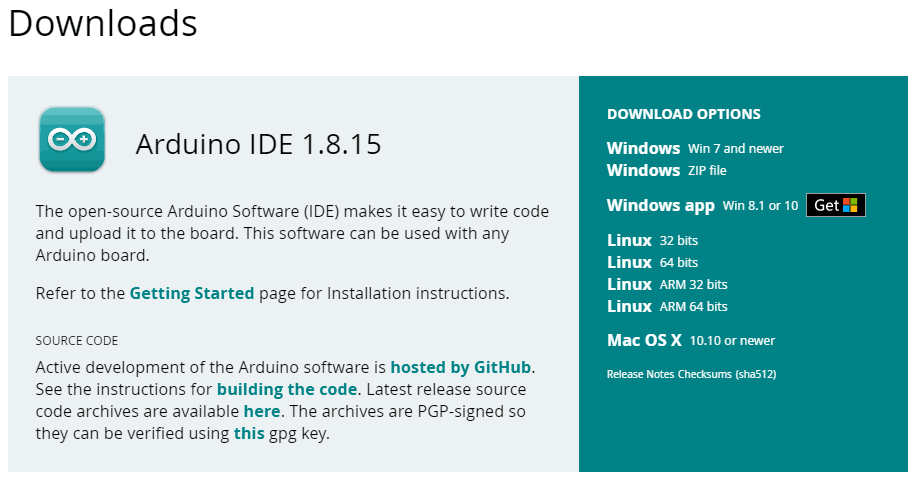
When you find this section, select the download option for your computer's operating system.
Note: although the Arduino IDE provides a version from the Microsoft Store itself, avoid using this version if you are using a Windows computer, as it is famous for containing several operating errors that can compromise its use. Therefore, for this operating system, opt for the compressed version ("ZIP File").
Note: although the Arduino IDE can be installed directly from the terminal on Linux operating systems, the version available in this installation usually has several malfunctions, so avoid using it.
An important detail to remember is that, although the Arduino IDE version in the image above is 1.8.15 (taken at the time this chapter was created), the Arduino IDE is always being updated and the current and stable version available at the moment you are doing this chapter may be different. Don't worry about this detail, as it won't affect the Vespa's operation.
After selecting the download option for your operating system, a donation window will open, as in the image below.
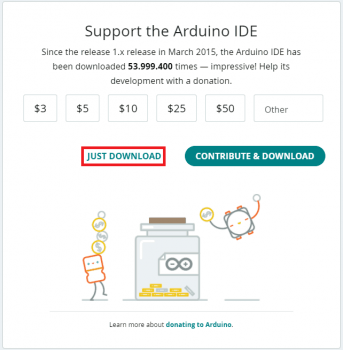
This donation is not mandatory, but is offered to help keep the Arduino IDE project free. If you don't want to contribute at this time, select the "Just Download" option, as marked in red above, to proceed with the free download. If you are interested in contributing with a donation to the project, select the amount you want to contribute, select the option "Contribute & Download" next to it, then follow the steps for payment.
Windows and macOS
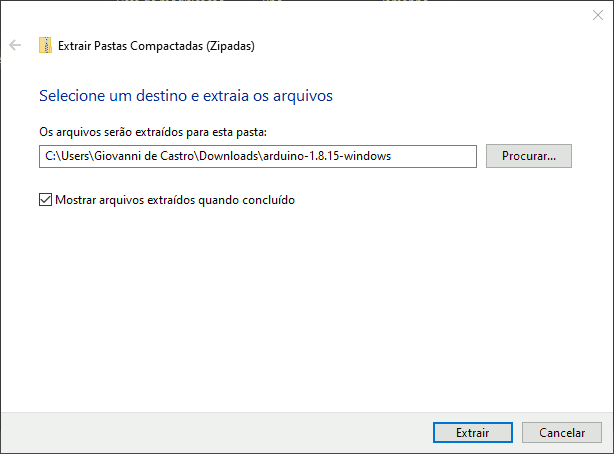
The installation process of the Arduino IDE on Windows and macOS computers is basically the same as they are compressed files. After finishing downloading the file to your computer, unzip the downloaded file in the directory of your choice (click with the right mouse button on the file and select the "Extract all" option), as in the next image, for example.
Once the extraction is complete, open the generated folder, and then look for the application "arduino", as marked in the following image.
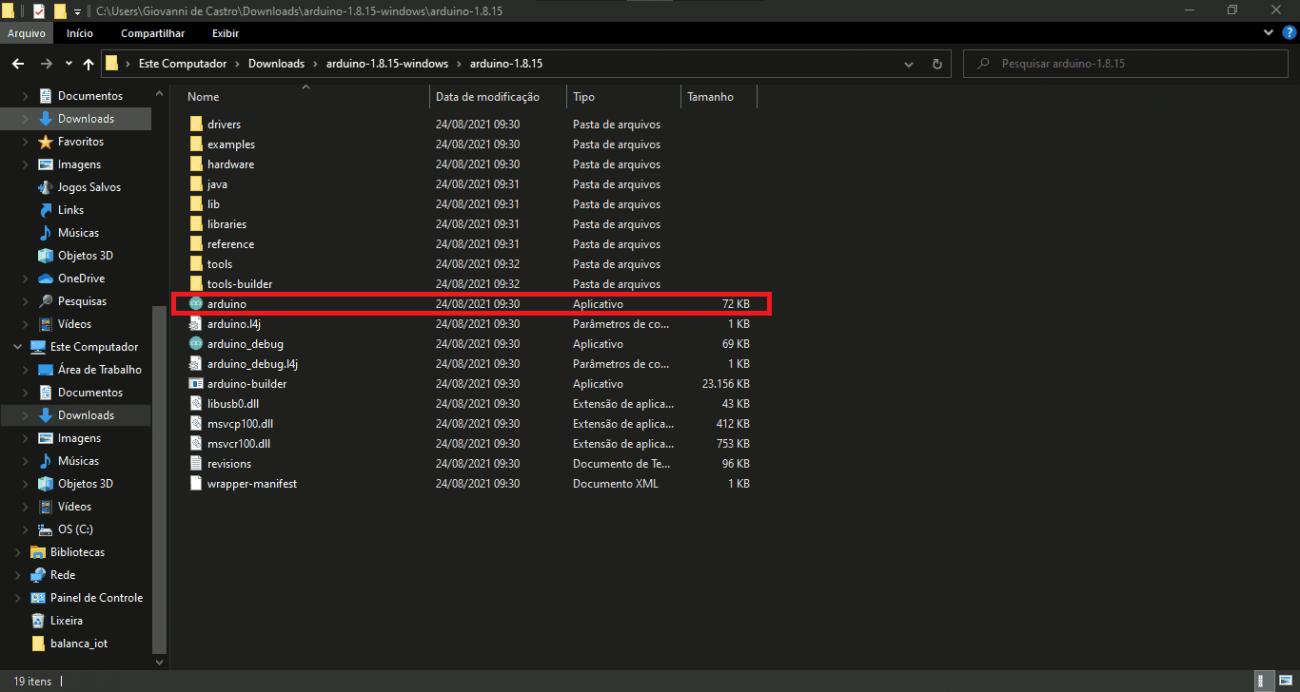
This app is the Arduino IDE, so just open it.
If you prefer, you can create a shortcut to this application and move the shortcut to a more easily accessible directory on your computer, such as the "Desktop".
Linux
On Linux computers, in addition to unzipping the file downloaded from the Arduino website, it is also necessary to run the install.sh file through the command terminal (remembering that it is necessary to access the folder's directory for this). Furthermore, for your user to have access permission to the computer's USB ports, you must send the command sudo usermod -a -G dialout <username> (remember to change the parameter <username> by your user name in the system), otherwise it won't be possible to upload codes to the Vespa.
Esp32 Boards Package Instalation
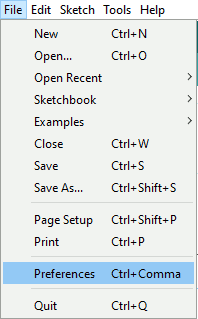
Now that the board is being correctly recognized on your computer, open the previously installed Arduino IDE so that we can install the ESP32 board package. With the Arduino IDE open, access your "Preferences" through the path in the image below. If you prefer, you can simply press the "Ctrl+comma" keys to open it.
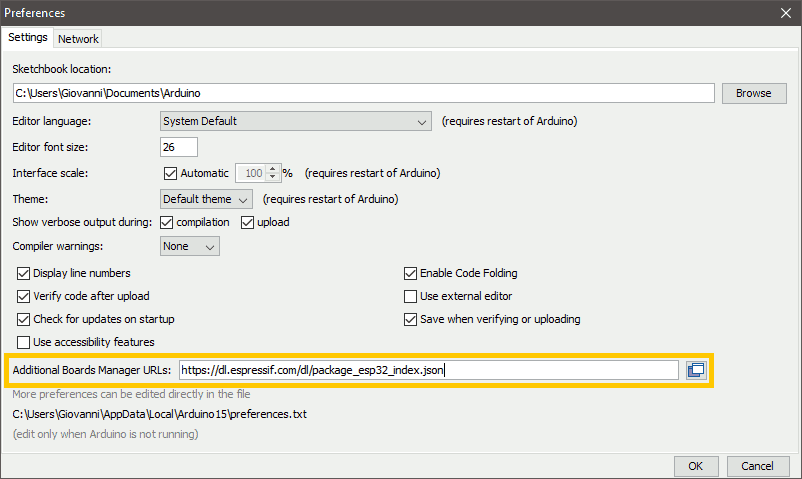
With preferences open, copy and paste the https://dl.espressif.com/dl/package_esp32_index.json link into the "Additional URLs for Board Manager" field, as in the following image.
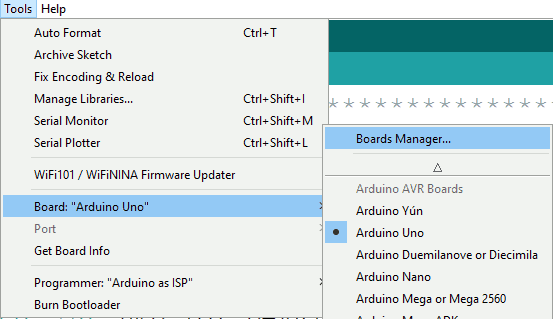
With the link added, we have to access the "Board Manager" through the path below.
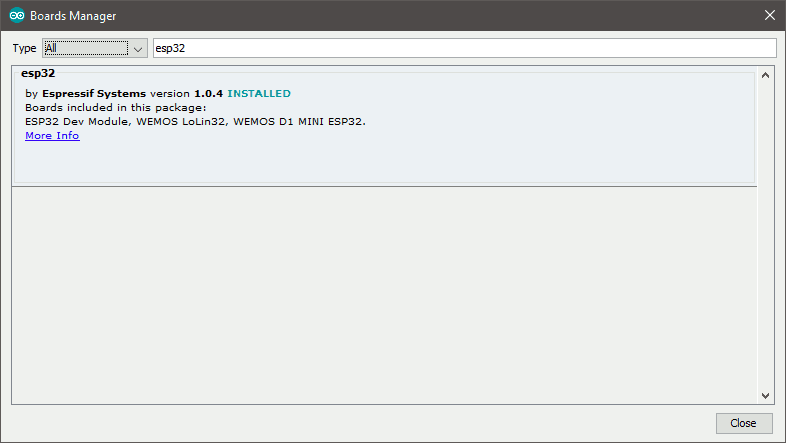
With "Board Manager" open, type "esp32" into the search bar to find the next image package.
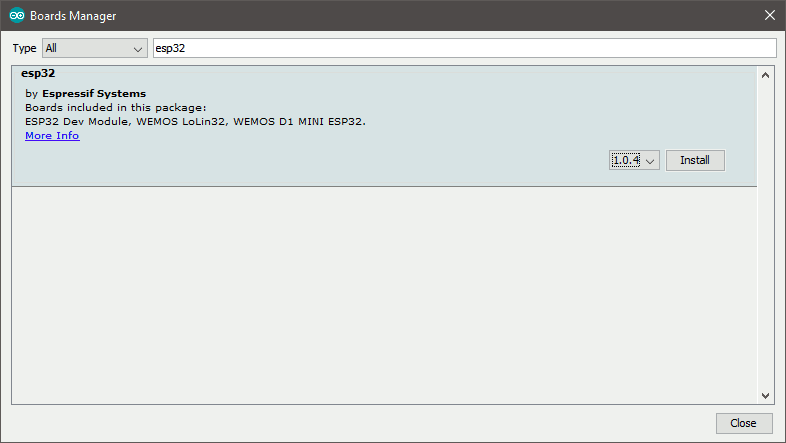
With this package in the list, press the "Install" button to start installing the latest version of the board package. This installation should take a minute, and when it is complete you will see the tag "Installed" next to the package name, as in the following image.
After installation, it will be possible to observe that the list of Arduino IDE board models has become even larger, containing several versions of ESP32 boards, as in the next image.
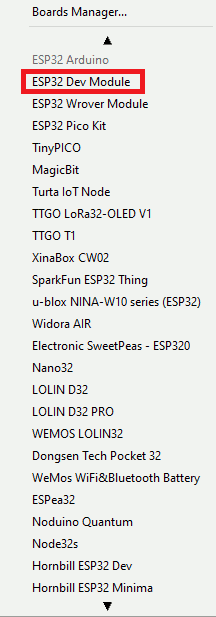
The board model that should be selected for the Vespa is the "ESP32 Dev Module", so you can leave it pre-selected if you like, and no other settings are needed in the board options.
Library Intallation
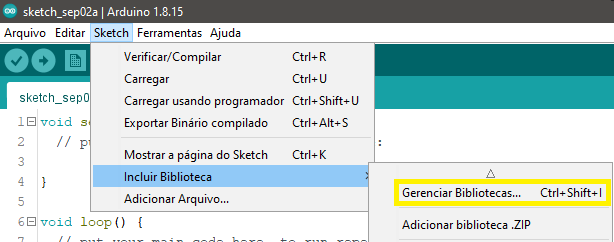
To facilitate the control of motors and other features of the board, a library was developed for Vespa. To install it, access the "Library Manager" in the Arduino IDE, following the path in the image below. If you prefer, you can simply press the "Ctrl+Shift+I" keys to open it.
This will open a window like the image below.

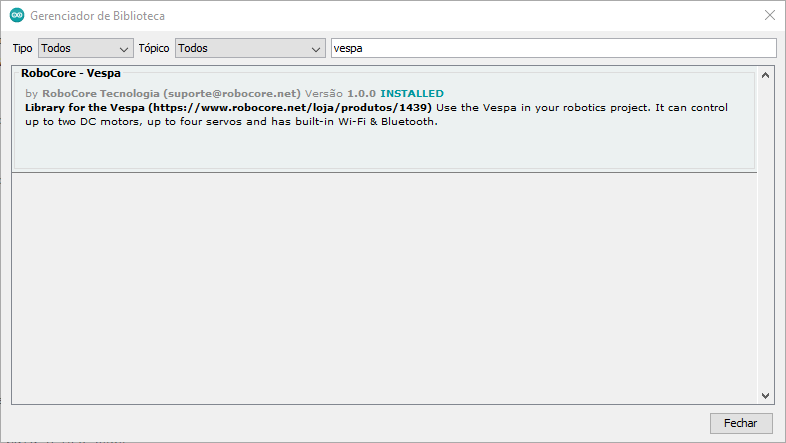
With that window, type "vespa" in the search field, then press "Enter". At this moment, the Vespa peripheral control library will be listed, as in the next image.
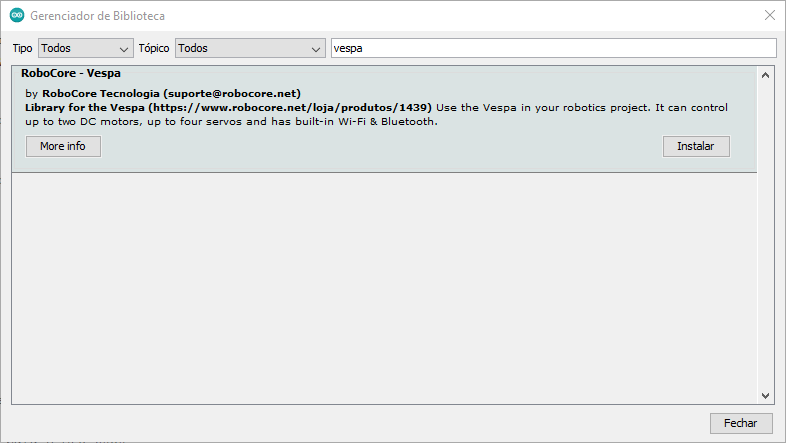
With this option listed, press the "Install" button marked above and wait a few moments. The library will be installed and, when the installation is finished, the "Installed" icon will be displayed next to its name, as in the following image.
Uploading the First Code
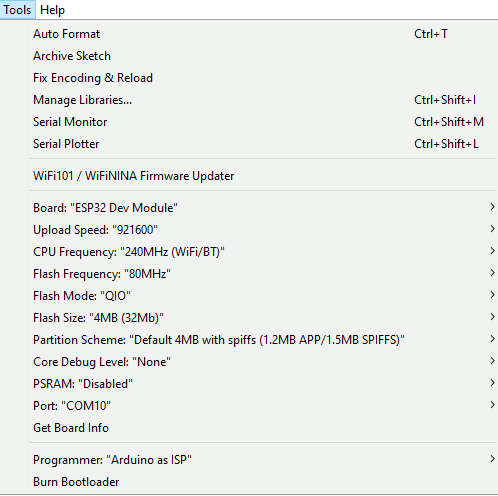
As with the vast majority of other microcontroller boards, the first code we will upload on the Vespa is the famous "Blink". To do so, we first have to configure the IDE for the board model used for uploading. As mentioned earlier, Vespa's board model is the "ESP32 Dev Module", so select it. It is not necessary to make any changes to the pre-made configurations of the selected model, but take advantage of the fact that the IDE's "Tools" menu is open and select the COM port corresponding to the Vespa on your computer, as in the image below.
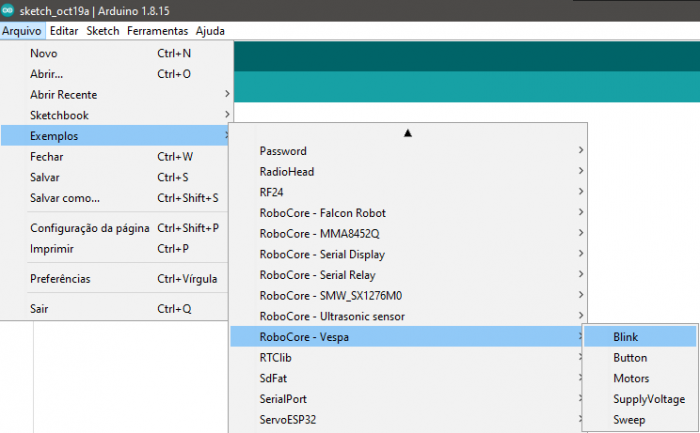
With the IDE configured, open the "Blink" example of the previously installed library, following the path in the image below.
With the code open, press the IDE's load button and wait a few moments. The code will be compiled and then uploaded to the board. Once the uploading is finished, the message "Done Uploading" will be displayed, as in the image below.

Along with this message, it will be possible to observe that the Vespa LED L is flashing every 1 second, as in the GIF below.
Going Beyond
Inside the library installed in this tutorial there are also other example codes for using the board to demonstrate all its functionalities. In other specific tutorials about the card, we show different possibilities of use.
Conclusion
In this tutorial we've seen the initial steps required for writing code on Vespa and we've uploaded the first example code for your library.
Troubleshooting
If you still have difficulties uploading the code to the board after checking the solutions below, send an e-mail to support@robocore.net so that we can help you in the best possible way.
Arduino IDE returned "Failed to execute script esptool the selected serial port Failed to execute script esptool does not exist or your board is not connected"
If you receive this message when trying to upload codes to the board, it is a sign that the selected serial port is not correct, so access your computer's "Device Manager" to check which is the corresponding serial port for your board.
Arduino IDE returned "A fatal error occurred: Failed to connect to ESP32: Timed out waiting for packet header"
This message is returned by the IDE when the board does not respond to an attempt to connect to the computer. Try again, but this time press and hold the "BOOT" button at the moment the "Connecting..." message appears. Also, make sure the board model in the "Tools" tab is correctly selected as "ESP32 Dev Module".
Arduino IDE returned "python executable file not found in $PATH"
This can occur on macOS and indicates that the operating system did not find the correct Python tool. In this case, open your computer's terminal (just type "terminal" in the search bar) and send the command sed -i -e 's/=python /=python3 /g' ~/Library/Arduino15/packages/esp32/hardware/esp32/*/platform.txt.