Arduino IDE Instalation
In this tutorial we will teach you how to install the programming software Arduino IDE.
First, keep in mind that you will need:
In this part we will show you how to install the IDE in Windows 8, Windows 7, Vista and XP versions.
First go to the IDE download page (link) and download the most current version for Windows. The IDE does not need to be installed, as it is an application made in Java and will be able to run on the most diverse operating systems.

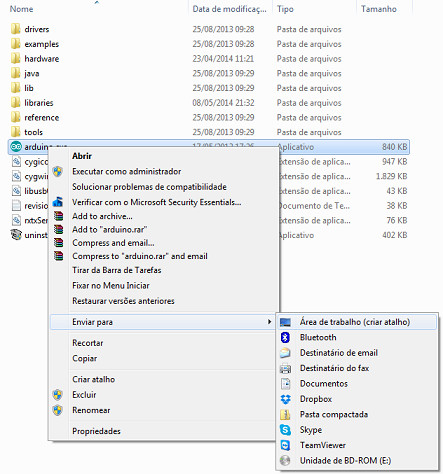
When the download is finished, unzip the folder in the directory: C:\ as shown in the figure below. (It is extremely important not to change the files in this folder unless you know what you are doing)
Now just create a shortcut to the IDE on the desktop and you'll be able to program your board!

Installing Arduino IDE on Mac
For Mac users, the procedure is similar to Windows.
Go to the IDE download page (link) and download the most current version. Unzip the folder into your preferred directory and the program is ready to use.
If you prefer, create a shortcut on your desktop.
Installing Arduino IDE on Linux
For installation on Linux systems, click on the following link and download of the latest version, available for 32-bit and 64-bit systems. With the file downloaded, unzip it and run the
First, keep in mind that you will need:
- One computer (Windows, Mac ou Linux)
- One Arduino board or compatible
- The appropriate USB cable for the selected board
In this part we will show you how to install the IDE in Windows 8, Windows 7, Vista and XP versions.
First go to the IDE download page (link) and download the most current version for Windows. The IDE does not need to be installed, as it is an application made in Java and will be able to run on the most diverse operating systems.
When the download is finished, unzip the folder in the directory: C:\ as shown in the figure below. (It is extremely important not to change the files in this folder unless you know what you are doing)
Now just create a shortcut to the IDE on the desktop and you'll be able to program your board!
Installing Arduino IDE on Mac
For Mac users, the procedure is similar to Windows.
Go to the IDE download page (link) and download the most current version. Unzip the folder into your preferred directory and the program is ready to use.
If you prefer, create a shortcut on your desktop.
Installing Arduino IDE on Linux
For installation on Linux systems, click on the following link and download of the latest version, available for 32-bit and 64-bit systems. With the file downloaded, unzip it and run the
install.sh file in the terminal. After installation, send the command sudo usermod -a -G dialout <username>, so that access permission is granted for the USB port, and restart the computer (reference).