Beginner Robotics Kit - 5. Hello World

There is a tradition in the programming world where one of the first things a beginner does when learning a new language is to print the message "Hello World!". However, with Arduino this tradition is a little different: instead of printing this message, what most people do when they take an Arduino in their hand for the first time is to flash an LED! It's your turn to do that.
As simple as this experiment may be, it is fundamental to the use of this material. When passing the code of this experiment to the board you will know if the driver is installed correctly, if the chosen board is in fact the one to be used, besides being able to see some key keywords for any code with Arduino, like setup() and the loop(). An important tip: the code that we are going to write is what we call case sensitive, that is, the program will differentiate whether you write with uppercase or lowercase letters. Writing "THIS" is different from writing "this".
Open the Arduino IDE and open the example Exp1_HelloWorld. To do so, access: File-> Examples-> RoboCore Falcon Robot-> Exp1_HelloWorld , as shown in the picture below:

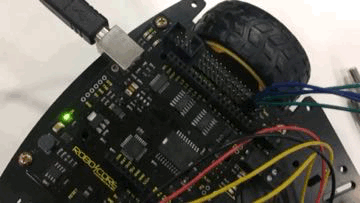
Once this is done, the program code will appear on the screen of the development environment. After loading the code to your Julieta you should notice it's LED flashing quickly, exactly twice a second.
It is interesting that you analyze the program to try to understand it. For that, below you will find all the code, just as you should see on the IDE's screen:
To start understanding the code, look at what comments are made of in a C language code. Comments are notes that the programmer makes in the code for reference. This means that they do not exercise any logic and are completely disregarded by the compiler. To make a comment that will go on for more than 1 line, use the notations: /* and */. The first (/*) indicates where comments begin and the second (*/) indicates where comments end.
If you want to make a single line comment, you can use the // notation. Anything that is on the same line and after that notation, will be considered a comment.
Comments are something you should use frequently when programming, whether for Arduino or any other language. They will serve as a diary where you explain what each line of code executes or even explain the logic of how it got there.
Understanding what a comment is, and if you look at the code more deeply, you can see that the code is written in just 9 lines. See if you can identify what these 9 lines are, which actually play commands in the code.
Throughout the experiments in this tutorial, you will get to know each of these structures.
However, before the LED can be switched on or off, it is necessary to configure the pin as an output. For this purpose, the pinMode(13, OUTPUT) function was used, which configures pin 13 as a digital output.
This function makes the program wait for the time determined in parentheses. In this case, 250 milliseconds of pause have been programmed: delay(250).
Try changing the time of the delay() function to change the speed at which the LED flashes. What is the highest speed you can still see? 10ms? 20ms?
Can you modify the pattern of the flasher to look like a heartbeat? (Hint: it may be necessary to add a second sequence of blink to the loop()).
As simple as this experiment may be, it is fundamental to the use of this material. When passing the code of this experiment to the board you will know if the driver is installed correctly, if the chosen board is in fact the one to be used, besides being able to see some key keywords for any code with Arduino, like setup() and the loop(). An important tip: the code that we are going to write is what we call case sensitive, that is, the program will differentiate whether you write with uppercase or lowercase letters. Writing "THIS" is different from writing "this".
Blinking the LED on the card
Open the Arduino IDE and open the example Exp1_HelloWorld. To do so, access: File-> Examples-> RoboCore Falcon Robot-> Exp1_HelloWorld , as shown in the picture below:
Once this is done, the program code will appear on the screen of the development environment. After loading the code to your Julieta you should notice it's LED flashing quickly, exactly twice a second.
It is interesting that you analyze the program to try to understand it. For that, below you will find all the code, just as you should see on the IDE's screen:
Understanding the Code
To start understanding the code, look at what comments are made of in a C language code. Comments are notes that the programmer makes in the code for reference. This means that they do not exercise any logic and are completely disregarded by the compiler. To make a comment that will go on for more than 1 line, use the notations: /* and */. The first (/*) indicates where comments begin and the second (*/) indicates where comments end.
If you want to make a single line comment, you can use the // notation. Anything that is on the same line and after that notation, will be considered a comment.
Comments are something you should use frequently when programming, whether for Arduino or any other language. They will serve as a diary where you explain what each line of code executes or even explain the logic of how it got there.
Understanding what a comment is, and if you look at the code more deeply, you can see that the code is written in just 9 lines. See if you can identify what these 9 lines are, which actually play commands in the code.
The Basic Structure of an Arduino Code
Every Arduino program has a basic structure that must be respected at all times. The main rule is that all Arduino code must have the setup() and loop()! functions. In addition, an order must always be respected:Throughout the experiments in this tutorial, you will get to know each of these structures.
Digital Outputs
Julieta has an LED connected to pin 13. To control this LED, use the digitalWrite(pin, HIGH/LOW) function. digitalWrite(13, HIGH); put 5V on pin 13. In this case, the LED lights up. digitalWrite(13, LOW) places 0V on pin 13. Turning off the LED.However, before the LED can be switched on or off, it is necessary to configure the pin as an output. For this purpose, the pinMode(13, OUTPUT) function was used, which configures pin 13 as a digital output.
Pausing the Program
The Julieta card works with a clock speed of 16MHz. This means that it performs 16 million operations per second. The digitalWrite() function takes less than 4us to execute. Therefore, in order to see the LED flash, it is necessary to pause the program flow. To do this, the delay(time_ms) function was used.This function makes the program wait for the time determined in parentheses. In this case, 250 milliseconds of pause have been programmed: delay(250).
Going Beyond
Try changing the time of the delay() function to change the speed at which the LED flashes. What is the highest speed you can still see? 10ms? 20ms?
Can you modify the pattern of the flasher to look like a heartbeat? (Hint: it may be necessary to add a second sequence of blink to the loop()).
Troubleshooting
My code is not being loaded!
- Make sure the USB cable is fully connected to the robot and the computer where you are making the code.
- Check again that the COM Port has been selected correctly in the Tools Menu. A good test to verify this is to unplug the computer card and see which of the COM ports disappear and reappear when you reconnect the cable to the USB.
- Check that the selected board is "Arduino/Genuino UNO" in the Tools Menu.
My engines are not running!
- Good! Because this code has no command for your engines to run. It just flashes the LED on the board.