BlackBoard USB Driver Instalation
Introduction
Have you just received your BlackBoard and don't know how to start programming it? In addition to the Arduino IDE, you will also likely need to install the USB driver compatible with your board's version in order for it to be recognized correctly on your computer. If you don't know how to install, or haven't installed the Arduino IDE yet, follow our tutorial Installing the Arduino IDE.
In this tutorial we will teach you how to easily install the USB driver corresponding to the version of your BlackBoard board, so that it is correctly recognized by your computer.
First of all, select, through the images below, the version of your BlackBoard UNO.
The Julieta V1.0 uses the same USB/UART converter as BlackBoard UNO V1.1, therefore follow the same installation procedure for BlackBoard UNO V1.1 in this tutorial. Now, the BlackBoard Mega, Vespa, and the USB x UART Converter use the same USB/UART converter from BlackBoard UNO V2.0, so follow the same installation procedure for BlackBoard UNO V2.0 in this tutorial.
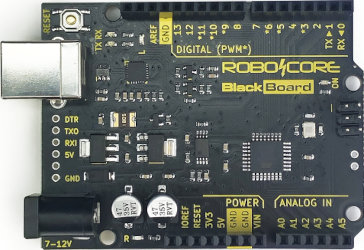
BlackBoard UNO R3 V2
The BlackBoard UNO V2 uses the CP2102N integrated circuit to communicate with the computer. Like the FT231X IC from BlackBoard UNO V1.1, this IC is very versatile and reliable in converting USB communication to UART communication (used for recording and communication with microcontrollers).
Board Recognition Verification
Before manually installing the USB driver on your computer, it is recommended to verify that your board is being recognized by it, as it is possible that the driver is installed automatically or even that it is already installed. Taking that into account, if your board is recognized by this initial test, do not install the driver following the steps in the installation section later in this tutorial, as it is possible that installing a duplicate driver will cause some malfunction in your computer.
If your board is recognized correctly, then the necessary USB driver has already been installed automatically or was already installed on your computer, so you can now upload a code for the board.
Windows
To verify recognition on a Windows computer, connect your BlackBoard to your computer, open the system's "Device Manager", expand the list of COM ports and check if a device is added to this list, as in the following image.

It is worth remembering that, in the image above, the tested board was recognized as "COM10", but your board in your computer may be recognized with another number. Don't worry about this, as the serial port number configured for your board does not influence its operation, the important thing is that it is being recognized correctly.
macOS
For macOS computers, go to "System Report", or "System Information", depending on your computer's version of macOS, open the "USB" folder in the "Hardware" directory and note if some device is added to this folder when connecting the board to the computer. On macOS computers, the BlackBoard is recognized as a 32-digit number in the "Serial Number" field, as in the image below, for example (in the Arduino IDE it will be displayed as "/dev/cu.usbserial-x").
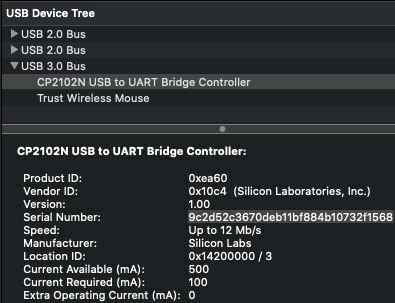
It is worth remembering that, in the image above, the tested board was recognized as "9c2d52c3670deb11bf884b10732f1568", but your board in your computer may be recognized with another number. Don't worry about this, as the serial port number configured for your board does not influence its operation, the important thing is that it is being recognized correctly.
Linux
To verify recognition on a Linux computer, open the command terminal and send the command dmesg | grep tty with the BlackBoard connected to a USB port, as in the image below. On Linux computers, the BlackBoard UNO is recognized as "ttyUSBx", as marked in the image below, for example.
As the previously mentioned command is a kernel command, it should be compatible with the vast majority of Linux distributions, but if it is not compatible with your computer, look in your operating system documentation for which command to use to perform this test.

It is worth remembering that, in the image above, the tested board was recognized as "ttyUSB0", but your board in your computer may be recognized with another number. Don't worry about this, as the serial port number configured for your board does not influence its operation, the important thing is that it is being recognized correctly.
Driver Instalation
If your board is not recognized "at first" as in the steps above, don't worry, it is possible to install the USB driver for your board manually with the steps described below.
Warning: Linux computers with kernel version 3.X or more current do not need to install the drivers in this tutorial, as they are already installed at the factory.
First, disconnect the board and download the compressed file with the driver compatible with your computer's operating system using the buttons below.
Windows 7, 8 e 8.1
With the file downloaded, unzip it and then run it as "Administrator", even though you are the only user. To do so, just right-click on the unzipped file, and then select the "Run as administrator" option, as in the image below. For systems with 64-bit architecture, run the option "x64", and for systems with 32-bit architecture, run the option "x86".

Windows 10 e 11
For Windows 10 or 11 computers, there are no ".exe" files, so locate the "silabser.inf" file, select it, right-click on it and then select the "Install" option, as in the image below.

macOS
The archive for macOS computers only has one file in "DMG" format, so just run it ("root" execution not required).
Procedure
Once the installer starts, follow the installation steps and wait a few moments. Once the installation is finished, a message will appear that the driver is ready for use, as shown in the image below.

Once the installation is finished, it is recommended to restart the computer so that the driver starts correctly. After the reboot, your board will already be recognized as a serial port, as shown in the previous section.
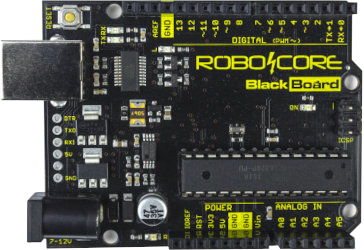
BlackBoard UNO R3 V1.1
The BlackBoard UNO V1.1 and the other boards discussed at the beginning use the FT231X integrated circuit to communicate with the computer. This IC, in addition to being very versatile, is a very reliable way of converting USB communication to UART communication (used for upload and communication with microcontrollers).
Board Recognition Verification
Before manually installing the USB driver on your computer, it is recommended to verify that your board is being recognized by it, as it is possible that the driver is installed automatically or even that it is already installed. Taking this into account, if your board is already recognized by this initial test, do not install the driver following the steps in the installation section later in this tutorial, as it is possible that installing a duplicate driver will cause some malfunction on your computer. .
If your board is recognized correctly, then the necessary USB driver has already been installed automatically or was already installed on your computer, so you can now load a code for the board.
Windows
To verify recognition on a Windows computer, connect your BlackBoard to your computer, open the system's "Device Manager", expand the COM ports list and check if a device is added to this list, as in the following image.
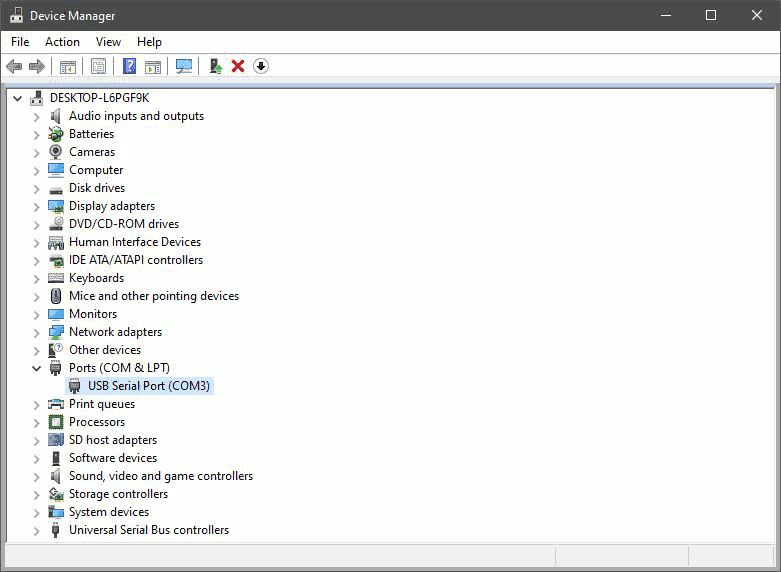
It is worth remembering that, in the image above, the tested board was recognized as "COM3", but your board in your computer may be recognized with another number. Don't worry about this, as the serial port number configured for your board does not influence its operation, the important thing is that it is being recognized correctly.
macOS
For macOS computers, go to "System Report", or "System Information", depending on your computer's version of macOS, open the "USB" folder in the "Hardware" directory and note if some device is added to this folder when connecting the board to the computer. On macOS computers, BlackBoard UNO V1.1 is recognized as "RCBB-X" in the "Serial Number" field, as in the image below, for example (in Arduino IDE , it will appear as "/dev/cu.usbserial-RCBB-X").

It is worth remembering that, in the image above, the tested board was recognized as "RCBB_3B974E", but your board in your computer may be recognized with another code. Don't worry about this, because the serial port code configured for your board does not influence its operation, the important thing is that it is being recognized correctly.
Linux
To verify recognition on a Linux computer, open the command terminal and send the command dmesg | grep tty with the BlackBoard just connected to a USB port, as in the image below. On Linux computers, the BlackBoard UNO is recognized as "ttyUSBX", as marked in the image below, for example.
As the previously mentioned command is a kernel command, it should be compatible with the vast majority of Linux distributions, but if it is not compatible with your computer, look in your operating system documentation for which command to use to perform this test.

It is worth remembering that, in the image above, the tested board was recognized as "ttyUSB0", but your board in your computer may be recognized with another number. Don't worry about this, as the serial port number configured for your board does not influence its operation, the important thing is that it is being recognized correctly.
Driver Instalation
If your board is not recognized "at first" as in the steps above, don't worry, it is possible to install the USB driver for your board manually with the steps described below.
Warning: Linux computers with kernel version 3.X or more current do not need to install the drivers in this tutorial, as they are already installed at the factory.
Warning: macOS computers already have an FTDI driver developed by Apple itself, so it is not necessary to install it, just update your operating system if it is a version older than 10.9 and repeat the verification step from the previous section.
First, disconnect the board and download the compressed file with the driver for Windows using the button below.
Download Driver for WindowsOnce the file is downloaded, unzip it and then run it as "Administrator", even if you are the only user. To do so, just right-click on the unzipped file, and then select the "Run as administrator" option, as shown in the next image.

Once the installer starts, follow the installation steps and wait a few moments. Once the installation is finished, a message will appear that the driver is ready for use, as shown in the image below.

Once the installation is finished, it is recommended to restart the computer so that the driver starts correctly. After the reboot, your board will already be recognized as a serial port, as shown in the previous section.
Conclusion
In this tutorial we saw how to install the correct driver for each version of the BlackBoard UNO, and we verified the recognition of the board on the computer. Now you can upload code to the board and start your projects!
Troubleshooting
If even when installing the driver following the steps described above, your board is not recognized correctly on your computer, contact us at (11) 3522-7626 or via email suporte@robocore.net so that we can help you in the best possible way.