Beginner Robotics Kit - 6. First Movements

No more blinking LEDs, it's time to program your Julieta board to get your robot going! In this chapter you will learn how to move the motors with the board, whether going forward, backward, or even making turns. This topic is extremely important as its concepts will be used in any mobile robot project. Pay close attention to what is proposed here, especially if you are new to using libraries.
To make all the work easier, it's time to use the FalconRobot Library. For this, the line #include "FalconRobot.h" must be added to the top of the code. This line will make it possible to create the FalconRobotMotors object that has the functions to control your robot's movements.
This line creates an object called motors that will allow you to control the left and right motors of the robot and thus control its movement. See more details in the Understanding the Code section.
Before sending this sample code, make sure your robot is in a safe position. The program will start immediately after you load the code into your Juliet. This can cause it to fall off your table or drop an object. For this reason, place the robot in a position where the wheels do not touch the table.
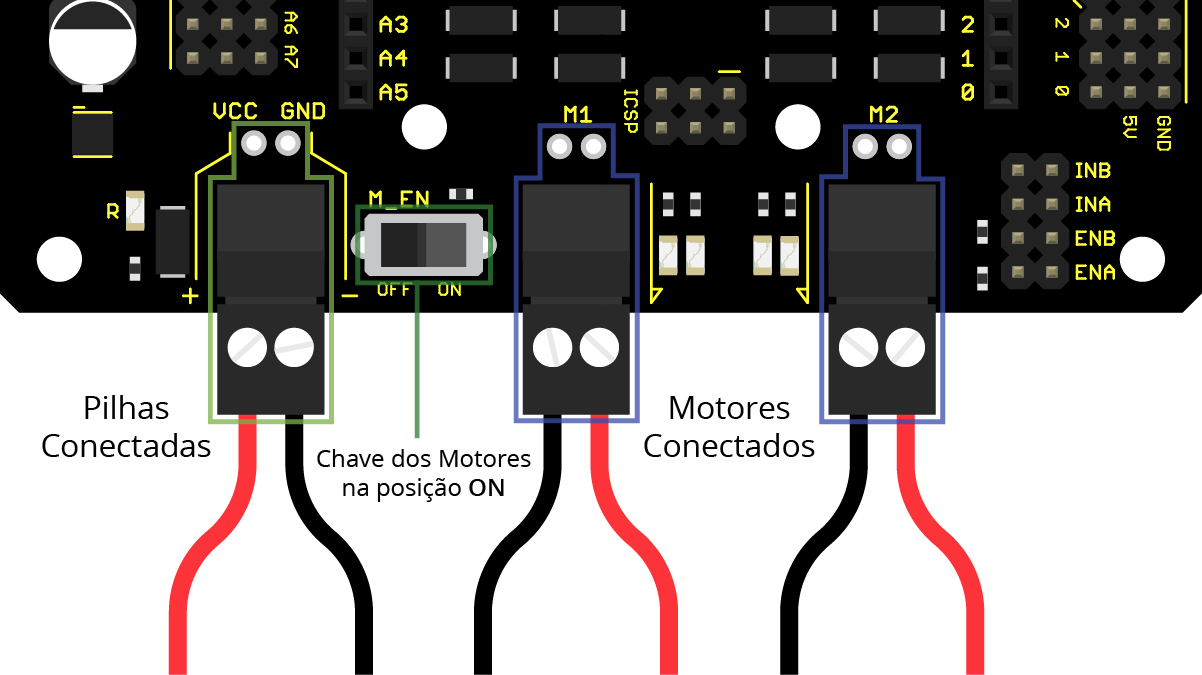
Important: for the example to work it is necessary that the motors are properly connected, the motor switch is in the ON position and the board is being powered by the batteries.
Upload this sample code to your Falcon Platform. To do this, go to: File-> Examples-> RoboCore Falcon Robot Library-> Exp2_1_DriveForward or copy and paste the sample code below.
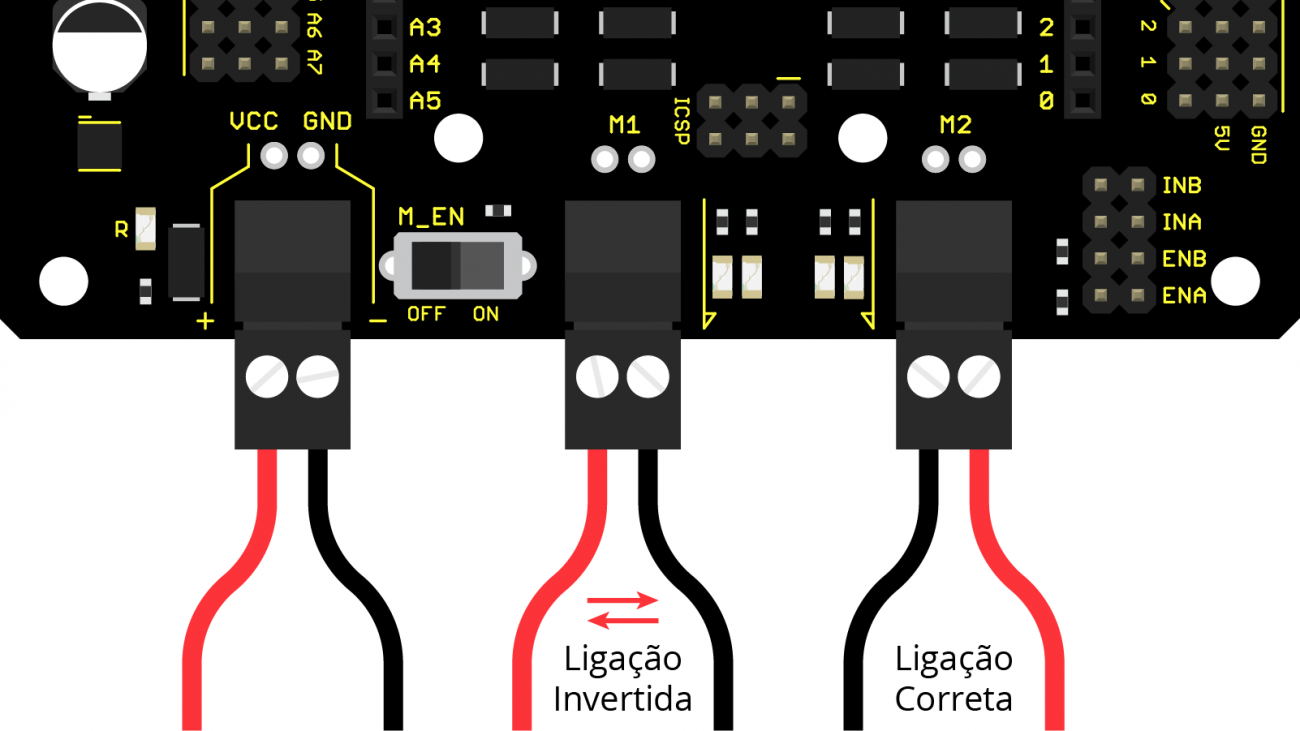
After loading the code into your robot, you should see the two engines spinning forward at full speed for one second and then stopping. If you happen to notice that one of the wheels is turning backwards instead of going forward, just invert the wires of the motors in question. For example, if the engine on the left is spinning backwards, remove the USB cable and the battery connector from the robot and reverse the wires from the left motor into its connector. Reconnect everything and you're done!
If both engines are spinning forward, unplug the USB cable and place your robot on the floor. Press the Reset Button to manually reset your program and see your robot moving forward for the first time!
Adding the include "FalconRobot" line to the top of the code allows you to access a number of classes, objects and functions that will help you to control your robot very easily. The FalconRobot library has routines for creating the following objects:
Remember that in this line an object called motors is created using the class FalconRobotMotors. It receives 4 parameters, which are, respectively, the pins EN1, EN2, IN1 and IN2 of the motors. This is called "initializing" an object. You can now use any method that is part of that class. To use (or "call") a method, the command will start with motors. followed by the name of the method. See some examples:
Sometimes running the engines at maximum speed causes the wheels to skid. If you experience problems with traction, try to work at lower speeds.
In a few moments you will notice that, depending on the speed that the robot is at, when it stops it, it will take some time until it stops completely, because even when turning off the motors, the robot will tend to move a little more by inertia.
Now that you know how to control your robot, see if you can move it forward for 2 seconds, stop for 1 second and reverse for 2 seconds.
In this experiment you will learn how to make your robot turn by adjusting the speed of the left and right motor independently. New methods of the FalconRobotMotors class will be presented that will allow you to control the engines separately.
Again, remember to keep your robot in a safe position so that it does not fall off your table or drop an object. Keep the robot's wheels away from the table or any other surface.
Upload this sample code to your Falcon Platform. To do this, go to: File-> Examples-> RoboCore Falcon Robot Library-> Exp2_2_Turning or copy and paste the sample code below.
Once loaded, the sketch will cause your robot's wheels to turn a little, change direction and stop. Remove the USB cable and place the robot on the floor. Press the reset button to restart the program. Watch your robot move!
On a completely flat and unobstructed surface, your robot must move forward in a straight line, turn about 90 degrees to the right, and then move forward again. Easy, if your robot is not rotating 90° correctly, there are two things you can do to adjust this rotation:
In the last example, you used the command motors.drive(speed, direction) to control both engines in order to make the robot go forward or back.
To control the engines individually, the FalconRobotMotors class has two methods used in the example:
Similar to .drive(speed, direction), speed is a value from 0 to 100. Where 0 is zero speed, that is, motor stopped, and 100 is maximum speed. And the direction, FORWARD, BACKWARD.
The Falcon Robotic Platform is very agile, so it is interesting to use lower speeds to turn. In the example, the speed used was 50%.
Any code that is placed in the loop() will be repeated infinitely as long as the robot is energized and is not reset. In the sample code, a code was placed so that your robot makes a figure 8. The two bars in front of each line of code are commenting on it. Remove the bars to see your robot make a figure 8.
You will probably have to adjust the speed and delay values so that the figure is closer to what you want.
With the concepts in this example, would you be able to program your robot to make a square? Now that you have adjusted the 90º curve, you just need to repeat this four times for your robot to make a box-like path.
Now it's time to use your imagination, what other geometric figures or any kind of pattern can you make?
Moving the robot forward
To make all the work easier, it's time to use the FalconRobot Library. For this, the line #include "FalconRobot.h" must be added to the top of the code. This line will make it possible to create the FalconRobotMotors object that has the functions to control your robot's movements.
This line creates an object called motors that will allow you to control the left and right motors of the robot and thus control its movement. See more details in the Understanding the Code section.
Before sending this sample code, make sure your robot is in a safe position. The program will start immediately after you load the code into your Juliet. This can cause it to fall off your table or drop an object. For this reason, place the robot in a position where the wheels do not touch the table.
Important: for the example to work it is necessary that the motors are properly connected, the motor switch is in the ON position and the board is being powered by the batteries.
Upload this sample code to your Falcon Platform. To do this, go to: File-> Examples-> RoboCore Falcon Robot Library-> Exp2_1_DriveForward or copy and paste the sample code below.
After loading the code into your robot, you should see the two engines spinning forward at full speed for one second and then stopping. If you happen to notice that one of the wheels is turning backwards instead of going forward, just invert the wires of the motors in question. For example, if the engine on the left is spinning backwards, remove the USB cable and the battery connector from the robot and reverse the wires from the left motor into its connector. Reconnect everything and you're done!
If both engines are spinning forward, unplug the USB cable and place your robot on the floor. Press the Reset Button to manually reset your program and see your robot moving forward for the first time!
Understanding the code
Adding the include "FalconRobot" line to the top of the code allows you to access a number of classes, objects and functions that will help you to control your robot very easily. The FalconRobot library has routines for creating the following objects:
- FalconRobotMotors - engine control
- FalconRobotButton - button reading
- FalconRobotLineSensor - reading of the line sensors
- FalconRobotDistanceSensor - distance sensor reading
Remember that in this line an object called motors is created using the class FalconRobotMotors. It receives 4 parameters, which are, respectively, the pins EN1, EN2, IN1 and IN2 of the motors. This is called "initializing" an object. You can now use any method that is part of that class. To use (or "call") a method, the command will start with motors. followed by the name of the method. See some examples:
Moving Forward / Backward
motors.drive (speed, steering) drives both engines. This method has two parameters: speed and direction (FORWARD or BACKWARD) . The speed is a percentage value, where 0 means 0% (Engine stopped) and 100 means 100% (engines at maximum speed). The direction can be FORWARD (forward) or BACKWARD (backward).Sometimes running the engines at maximum speed causes the wheels to skid. If you experience problems with traction, try to work at lower speeds.
Stopping the engines
motors.stop() turns off the engines, causing the robot to stop. In this case, it is the same as setting the speed to 0%.In a few moments you will notice that, depending on the speed that the robot is at, when it stops it, it will take some time until it stops completely, because even when turning off the motors, the robot will tend to move a little more by inertia.
Going Beyond
Now that you know how to control your robot, see if you can move it forward for 2 seconds, stop for 1 second and reverse for 2 seconds.
Troubleshooting
Compilation error - ' FalconRobotMotors ' does not name a type
This indicates that the FalconRobot Library has not been added to the sketch correctly. This can be a result of basically two things:- #include "FalconRobot.h" - this line must be at the top of the code and written exactly like this.
- You have not installed the Library correctly. Go back to Chapter Software and Drivers and make sure to install the FalconRobot Library correctly.
The engines are not turning!
- Check that the engine switch is in the ON position
- Make sure the batteries are properly attached to your robot and that the connector is well connected to your Juliet board.
- Make sure you have connected the motors correctly. See the Electronic Assembly Chapter for more details.
The robot moves, but it spins in a circle!
- Probably one of your wheels is turning backwards instead of turning forward. Identify which wheel it is and invert the wires of that engine, just change the red wire for black.
The robot doesn't walk straight! He's making a turn!
This is very common for all robots that have independent driving wheels. There are many reasons for this, construction of the engine itself, small difference in wheel diameter, etc. Here are some things you can do to close the gap:- Make sure there is nothing scraping on the robot's wheel. Note that the inner part of the wheel is not touching the chassis. If this is true, try to leave a small distance between the wheel and the chassis, just enough so that they don't touch each other anymore.
- To go in a straight line, it is necessary that the two wheels turn at exactly the same speed. However, by rotating the engines at full speed, the wheels may slip, losing traction. Therefore, try to use a speed less than 100%.
- Using an encoder would be a way to ensure that the two wheels turn exactly the same distance. This concept will not be covered in this tutorial, but you can seek further information on the subject.
Making Curves
In this experiment you will learn how to make your robot turn by adjusting the speed of the left and right motor independently. New methods of the FalconRobotMotors class will be presented that will allow you to control the engines separately.
Again, remember to keep your robot in a safe position so that it does not fall off your table or drop an object. Keep the robot's wheels away from the table or any other surface.
Upload this sample code to your Falcon Platform. To do this, go to: File-> Examples-> RoboCore Falcon Robot Library-> Exp2_2_Turning or copy and paste the sample code below.
Once loaded, the sketch will cause your robot's wheels to turn a little, change direction and stop. Remove the USB cable and place the robot on the floor. Press the reset button to restart the program. Watch your robot move!
On a completely flat and unobstructed surface, your robot must move forward in a straight line, turn about 90 degrees to the right, and then move forward again. Easy, if your robot is not rotating 90° correctly, there are two things you can do to adjust this rotation:
- Try changing the rotation time by modifying the delay(500) time. The default for the example is 500ms, try to increase or decrease according to the result you have observed.
- You can also change the speed at which the robot rotates, up to a speed that causes the robot to rotate the desired 90°.
Understanding the Code
In the last example, you used the command motors.drive(speed, direction) to control both engines in order to make the robot go forward or back.
To control the engines individually, the FalconRobotMotors class has two methods used in the example:
Similar to .drive(speed, direction), speed is a value from 0 to 100. Where 0 is zero speed, that is, motor stopped, and 100 is maximum speed. And the direction, FORWARD, BACKWARD.
The Falcon Robotic Platform is very agile, so it is interesting to use lower speeds to turn. In the example, the speed used was 50%.
setup() vs. loop()
Up to that point, the codes were all built into setup(). Any code that is placed between the { and } keys after setup() will only be executed once. This is very convenient for testing single instructions or routines. But, what if you want to repeat a pattern, like a square for example?Any code that is placed in the loop() will be repeated infinitely as long as the robot is energized and is not reset. In the sample code, a code was placed so that your robot makes a figure 8. The two bars in front of each line of code are commenting on it. Remove the bars to see your robot make a figure 8.
You will probably have to adjust the speed and delay values so that the figure is closer to what you want.
Going Beyond
With the concepts in this example, would you be able to program your robot to make a square? Now that you have adjusted the 90º curve, you just need to repeat this four times for your robot to make a box-like path.
Now it's time to use your imagination, what other geometric figures or any kind of pattern can you make?
Troubleshooting
The robot can't move! But you hear a high-pitched noise!
- If you can feel that the engine is trying to turn, but you can't, try increasing the nominal speed in the code. If that doesn't work, even with the maximum speed, it may be time to replace your robot's batteries.